
Workspace
The "Project" section in Teamcamp is a central hub for managing and organizing your projects. It is a dedicated space where you can create, view, edit, and oversee all the projects your team is working on.
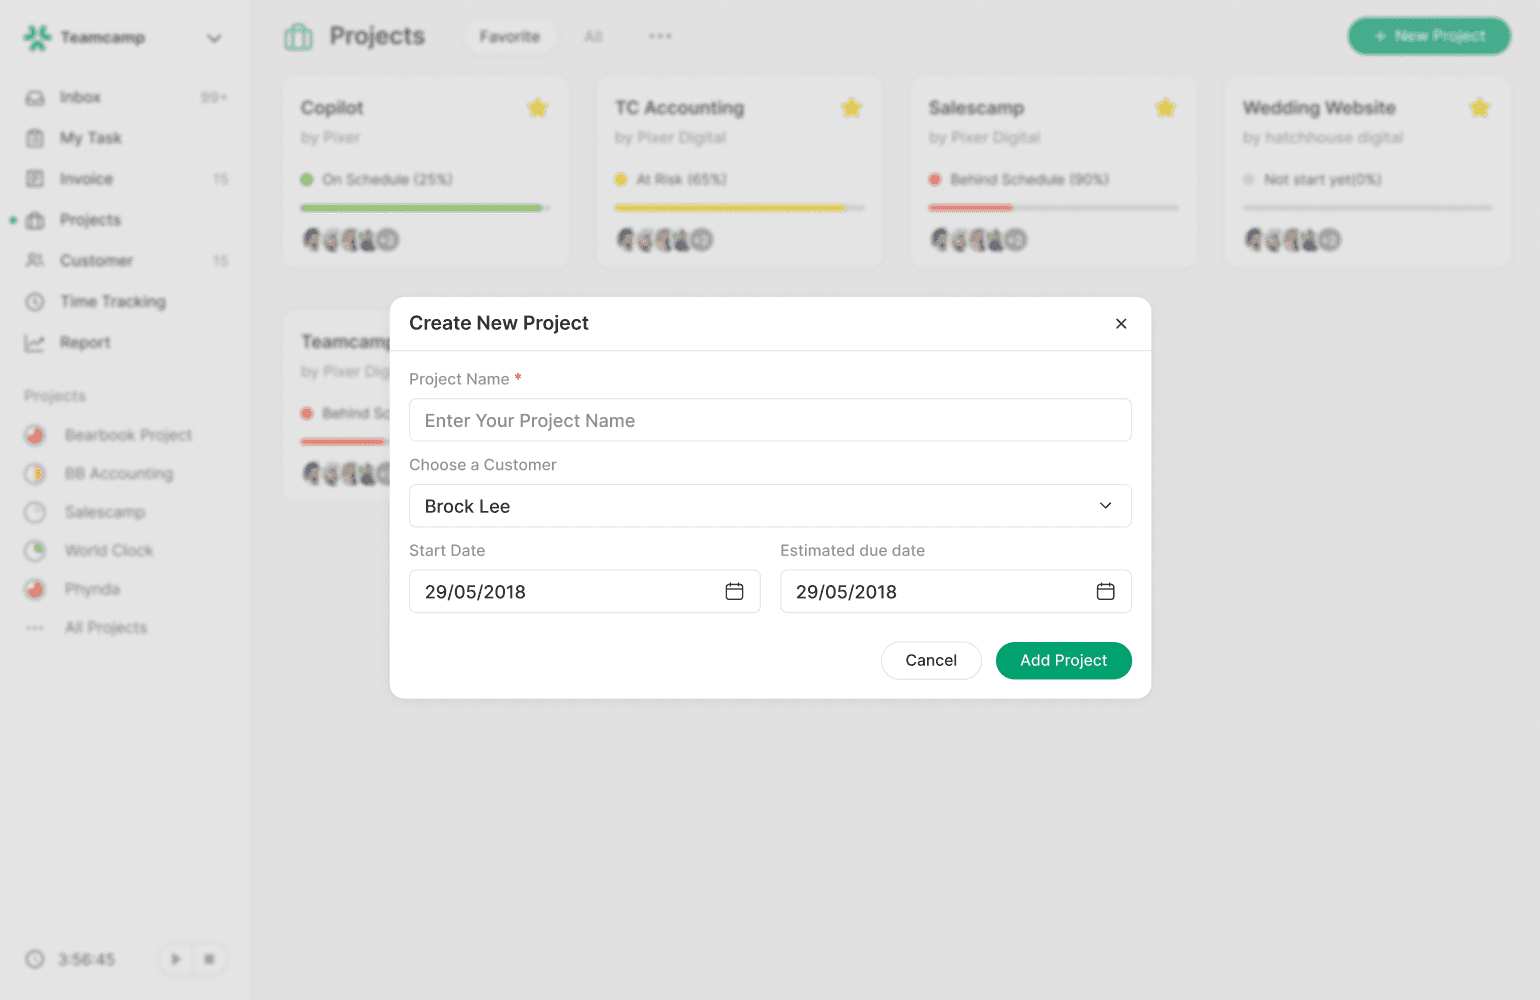
Create a new Project.
After logging in, you will be directed to the Teamcamp dashboard. On the left sidebar, you'll see several navigation options. Click on "All Projects" to access your project management area.
The "New Project" button is on the top-right corner of the screen. Name your project and select the customer for whom this project is being executed. Specify the project's starting date and an estimated due date for your project. Click on the "Create Project" button, and the project is created. Check out this article for information about projects.
Add Team Members
You can invite team members who are part of the project to the project by sending them the invitation.
Click “…” on the project dashboard, and Select Settings.
Select “Manage” from Team and select the team member from the list.
And if someone is missing from the list, Click. “Invite New Member.” Add Name and e-mail.
This will send them the mail, and they can join.
Creating Tasks and Assigning Them
Go to your project's dashboard and Click "Create Task" to add a new task. While creating a task, you can assign it to a team member.
Just Beside the task, Click “+” & select team members to assign the task.
You can learn how to manage tasks further.
Track Progress
On your Project dashboard, you can monitor the project's status and see if it's on track or behind schedule.
Creating Tasks
When managing your project's tasks, the first step is creating them. Here's how to do it:
Click on the "Create Task" button: Click"+" in the top right corner within the project space.
Provide a Name and Description: Give your task a clear and concise name. Include a detailed description if necessary to provide more context.
Assign Tasks: Add tasks to the project by selecting them from your project list. This helps you connect specific to-dos with your project.
Set Due Date and Priority: Specify a due date for the task, ensuring it aligns with your project timeline. Assign one of the three priority levels:
High Priority: Mark tasks as a high priority when they require immediate attention. These are your top priorities for the day.
Medium Priority: Tasks that are important but less urgent fall into this category. Attend to them once your high-priority tasks are complete.
Low Priority: These are tasks of lesser importance, which can be tackled with extra time.
Task Groups (Optional): You can further organize your tasks by creating groups. For example, you can create groups like "Todo," "In Review," "In Progress," etc., to categorize your tasks efficiently.
Attachments (Optional): You can attach files or additional information to your tasks. This can provide better context and resources for task completion.
![[Add image of the Create task Dialog box]](https://framerusercontent.com/images/2IkXszUahtaf4LL0rSaxpOH0I.png)
